
Welcome to the third lesson in the “Make a Simple Game in Godot” series, my name is Chadot and today I will teach you how to create buttons for the main menu.
Creating buttons
Technically speaking anything can be a button, for example a 3D box can trigger an action when clicked. But to get this functionality working would require a lot of coding. But we don’t have to worry about that because Godot comes with built-in button nodes that spares us a lot of coding. This way we can focus on the simple stuff!
Let’s begin by first opening up our MainMenu scene. I will double–click on it from the FileSystem panel.

Looks way too empty! But now you can also see how the homework from the previous lesson looks like.
Anyhow, let’s do something about our empty scene shall we?
Click the + button in the Scene panel to the left.

This brings up the familiar Node List, look for a node called Button and double–click on it or click the Create button at the bottom of the Node List.

Now we have a button in our scene! Don’t forget to save!
Resizing anything is easy
If we look inside our scene view, you will notice that our button is too small, almost not visible at all.

We need to remedy this immediately!
Make sure the button is selected in the Scene panel and then click and hold on the bottom right orange dot in the scene view. Drag it out diagonally until you feel the size of the button is perfect.

There, much better!
Now we can at least see the button. But it would be great if we could tell players what the button does. This can be done by adding text.
Adding text through the inspector panel
Adding text is a simple process and can be done using the inspector panel to our right.

The inspector is one of the most important panels and one which you will be spending a lot of time in. The inspector shows different properties for the specific node that you have currently selected. So it will show different properties when you select different nodes. If you de–select everything then the inspector will show up as empty.
Make sure to select our newly created button in the Scene panel, this will update the inspector to show us all the properties that are available for our button and what values these properties have.
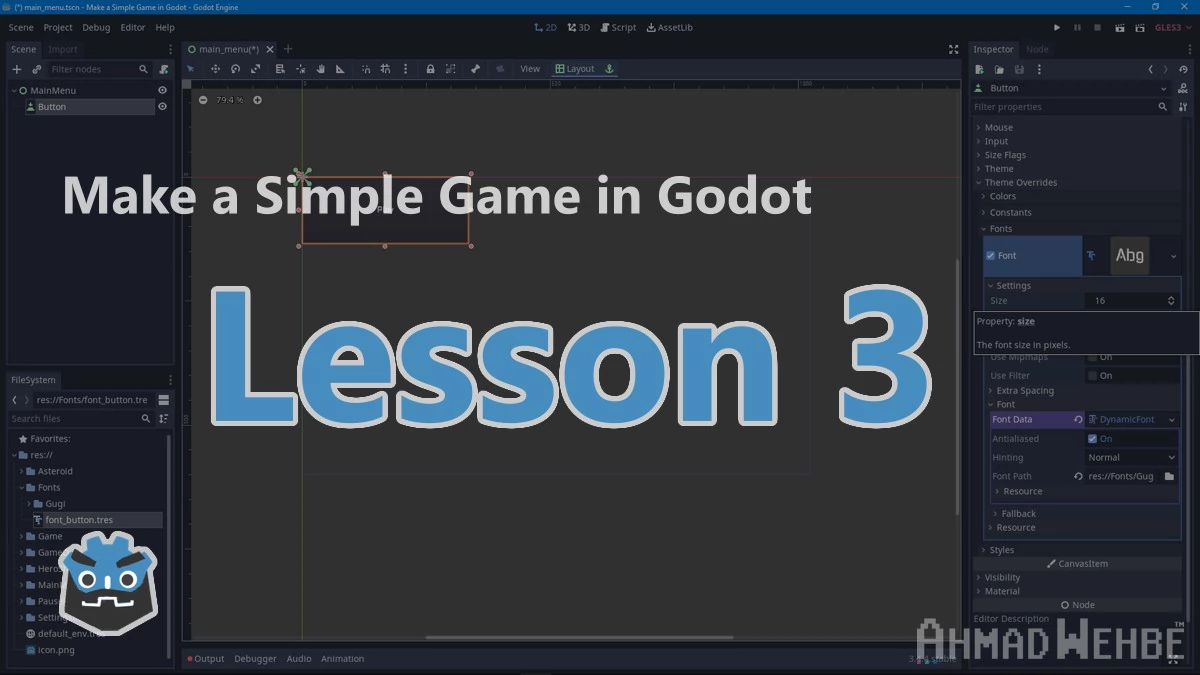
If you take a look at each of the button’s properties in the inspector, you will quickly discover a property named Text which is currently blank.

The next step is pretty obvious! To get some text on our button all we have to do is write something in the field next to the Text property in the inspector panel.
You can type “Start” or “Play” or “New Game”, it is all up to you which phrasing you want to go for.
I will write “Play”

Awesome!
But there’s a problem. The font size way too small, it is barely readable at this size, so we will need to make it bigger.
Text and fonts in Godot
Changing the size of the text requires a couple of extra steps. But, once we are done with these extra steps then dealing with text within Godot will be easy as eating cake (eating a cake is easier than making one).
So, the first thing we need is actually a font. Godot doesn’t come with a font, this is why we can’t change the text size. The current text we see on our button is actually just a placeholder.
You can obtain fonts from many places, one being your own device! In your device’s system folders should be a folder containing all fonts used by your device. You can drag a font you like from that folder directly into your Godot project by releasing the mouse while hovering over the FileSystem panel in Godot. This will place the file inside the active folder, so always make sure you have the correct folder selected when dragging files this way.
However, we will getting our font from the internet, namely this one: https://fonts.google.com/specimen/Gugi

I think it has a cool style and will be perfect for our little project. However, you are free to browse and search for other fonts that you would rather use instead.
You can type a word or a sentence in the box to check how the text you want will look like in this style of font. Once you have found a font you like, then click the Download family button.

Now before we import the font into our project let’s first create a folder for it so we can keep things nice and tidy.
Let’s create a folder called Fonts and inside this folder we will create another folder and name it after the font name itself.

We can finally drag and drop the font and the license text that came with it inside Godot into this folder we just created. Just make sure the folder is selected, otherwise the files will end up in the root, if this happens then don’t worry, just select the files and drag them into the correct folder, easy!
Although we dragged and dropped multiple files, the font file and the license text file, only the font file is showing in the FileSystem panel. This is normal. Godot only shows files it can understand. However, if we browse to our project folder on our device’s disk, we will see both files are available.

Great!
Now we have access to a font which we can use for our button, but we will also be using it for other things later on. You can of course use multiple fonts if you want, for example the buttons can be one font and the score text can be a different font, etc. That’s all up to you.
Setting up a font
Let’s go back to our Scene panel and select our button.
If we look at the inspector panel, we will find a property called Theme Overrides.

This reveals even more properties!
Click on the Fonts property.

Click on the [empty] box and a dropdown menu will show up.
In this dropdown menu we will select New DynamicFont:

This creates ADDITIONAL properties for us to use. It is easy to get lost but please follow these steps carefully and with time you will find yourself speeding through this process.
What we are doing right now is creating a DynamicFont resource. This resource can then be saved and re–used for other nodes and even copied over to other projects. So even though this process is a bit daunting it is well worth it in the long run!
In our DynamicFont resource there is a property called Font, click it and then click the [empty] field.

This prompts us to create an additional resource which our DynamicFont will use as the font.
Click New DynamicFontData.

This creates the resource our DynamicFont will be using, which also contains the actual font data.
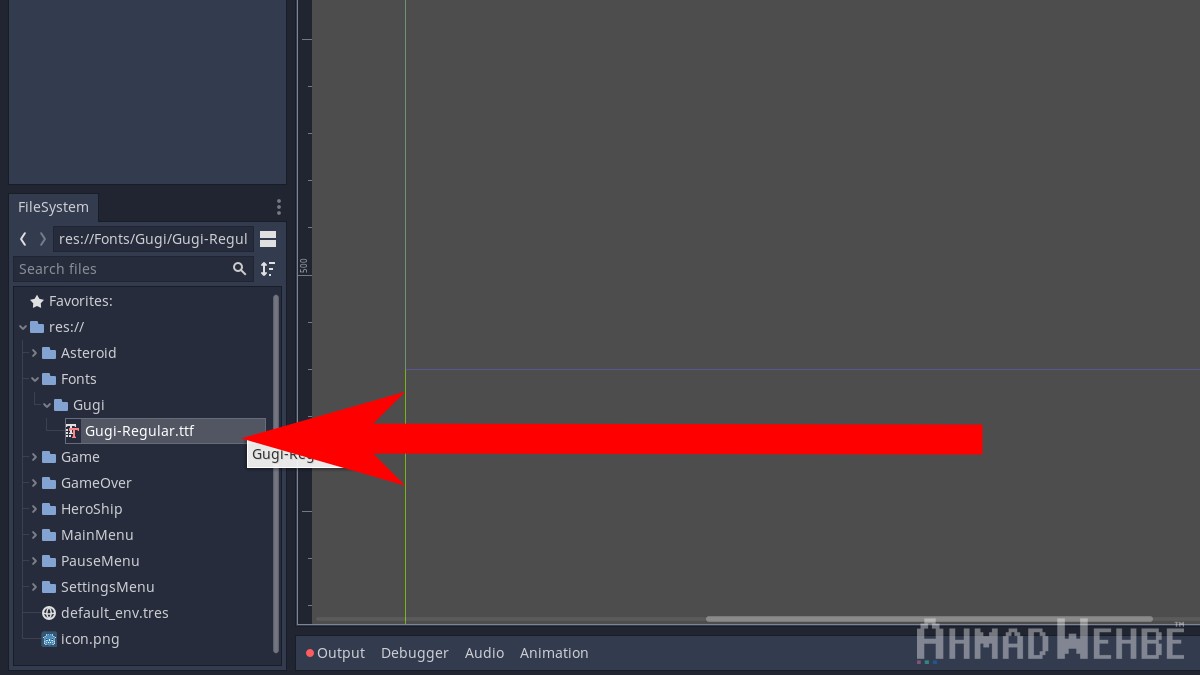
The DynamicFontData contains a property called Font Path, click it will allow us to finally select the font that we downloaded earlier.

Clicking the Font Path will prompt us to select the font we want to use.
We created a folder specifically for our fonts, so navigate to it and select the font you want to use.
Click Open to confirm our selected font.

Now before we do anything else, let’s save our newly created DynamicFont resource so we can skip repeating this whole process in the future.
Scroll up to the Font property under Theme Overrides > Fonts and click on the DynamicFont drop–down arrow and click Save from the drop–down tree.

This will prompt us to save our DynamicFont resource.
However, the pre-selected folder and name of the file are both wrong.

We need to navigate to the correct folder and rename our file properly so its purpose is better communicated.
So let us navigate to the font folder we created previously, and as for the file name we will rename it to font_button.tres
Click on the Save button at the bottom once everything is corrected

After we hit save the resource will be available in our FileSystem under the Fonts folder:

This gives us a font resource that we can easily drag and drop whenever we need a font.
Changing font size
There are two ways we can change the font size in our DynamicFont resource. We can do it directly from whatever node is using the DynamicFont resource:

Or, the way I prefer doing it is by opening the DynamicFont resource itself from the FileSystem panel and make the changes that way instead.

I find this method less cluttery and makes it easier to keep track of which resource I am actually making changes to.
I only use the other, direct method, when I want to make a unique version of the resource and apply custom values that are specific for a set of nodes.
Now, we will change the font size.
Using whichever method you prefer, set the font Size property to a value of 40.

Our text for the button is now bigger and much more readable!
More buttons!
Now that we did all that work for our button we can simply duplicate it for all our other button needs.
We will duplicate our button twice:

We now have three buttons in our Scene tree but only one is visible in our Scene view!
This is because they are stacked on top of each other. So let’s go ahead an move them around a bit to make our Main menu look a bit nicer.

Awesome!
But there is a problem, the name of the buttons in the Scene tree doesn’t tell us much and the text on the buttons needs to change.
So let us go through each button in our Scene tree from top to bottom and rename the button node and button text accordingly:
- Play
- Options
- Exit

Done!
But there is a problem. The order in the Scene view doesn’t match the order in the Scene tree. This is because when I moved the buttons around in the Scene view, I was selecting the buttons using the Scene view, which selects the top most object, which is always the last node in the Scene tree. This is working as intended and there is logic behind it. The last node gets loaded/rendered first. Just think of it as layers in a painting program but instead of “top to bottom” think of it as “bottom to top”.
If you made the same mistake as me then let’s go ahead and move the buttons around, we just have to switch the exit and play buttons and that should do it.

That’s it!
Now we have a simple Main Menu scene designed and ready to be used in later lessons where we will add different functionalities for each button so something can happen whenever we press them.
Conclusion
You have learned the process for creating buttons and how to populate a scene with said buttons.
You also learned how to add fonts to your Godot project and how to create DynamicFont resources that can be used on various nodes across the entire project, and which can also be copied over to future projects.
Homework
Play a bit with the font settings to try and get things to look more interesting, for example, adjust the Character separation under the Extra Spacing properties of the DynamicFont resource.
Open up the Pause scene and add two buttons:
- Resume
- Quit
Open up the Game Over scene and add two buttons:
- Try Again
- Main Menu
Back in the Main Menu, make the Play button’s text slightly bigger than all other buttons, to make it stand out more than the other buttons.